Windows Operating System is widely used in the market and is highly applauded by the users. The features of the Windows are best at par and one of such is the updates. Windows enable the users to run parallel with the technology and hence provide the updates feature. But sometimes, Windows update error becomes the hurdle in the path. The error fails to update the windows and due to the same, most of the applications stop responding. One of the most irritating error is Windows Update Error 0x80070422.

However, if you met with such a situation and looking for a way out, then don’t get worried as you have landed in the right place. Here, you will get the best and comprehensive solution to fix the Windows Update Error 0x80070422. There are a bunch of methods listed below which will help you to fix an issue. On the off chance, if you get succeed in any one of the methods, then skip the others. Now get ready to find the solutions.
Contents
Quick and Effective Ways to Fix Windows Update Error 0x80070422
Below are the most effective methods to fix the annoying Windows Update Error 0x80070422.
First and Foremost check the running status of Windows Update
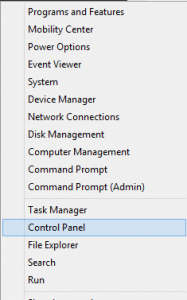
- Open Control Panel from the Start menu.

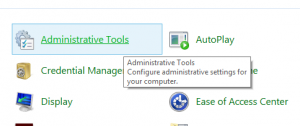
- Now, move to the section ‘View by’ and select ‘Large Icons’ and thereafter you will find a list of applications. Now click on the ‘Administration Tools’ located at the top of the screen.

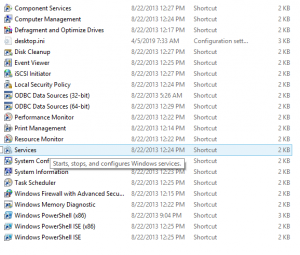
- Soon, you will find the bunch of features on your screen, click on ‘Services’.

- Now scroll down the page and move to the ‘Windows Update’ section.

- After selecting the same, right-click on it and select ‘Properties’ and then you will find a new tab on your screen and your job is to select the ‘Automatic’ from the drop-down menu of ‘Startup type’.

- Repeat the task for ‘BitLocker Drive Encryption Service’, ‘DCOM Server Process Launcher’, Network Connections and Windows Firewall. All the services must be in the running status and if anyone is stopped, then you can move to the properties section and select ‘Automatic’ from the ‘Startup type’.
- Once the task is done, close all the programs and restart your computer.
Make changes in the Network Connections-Disable IPv6
- Open Control Panel and then click on the ‘Network and Sharing Center’.

- In the Network section, you will find your connection and your task is to choose the same and then click on it to get the detailed status.
- Now, click on ‘Properties’ and thereafter you will get the features of the connection.

- Scroll down the bar and click on the box ‘Internet Protocol Versions (TCP/IPv6)’ and uncheck the tick mark.

- After completing the above process, click on the ‘OK’ button and then restart your computer.
Set the value of Featured Software Data to 1
- To perform this task you will have to open the ‘Registry Editor’ and for that press the ‘Windows’ key and ‘R’ key together and once you find the dialog box, enter ‘Regedit’ and hit ‘Enter’ button.

- Soon you will find the page displaying several applications, move to ‘HKEY_LOCAL _MACHINE’ and click on the arrow button and then select ‘SOFTWARE’.

- Now, scroll down the ‘SOFTWARE’ section and click on ‘Microsoft’.

- In the ‘Microsoft’ section, you will get ‘Windows’ icon, click on the arrow button and select ‘Current Version’.

- Now, move to the ‘Windows Update’ section listed in the ‘Current Version’ and choose ‘Windows Update’.

- Now, click on the ‘Auto Update’ listed in the ‘Windows Update’ section and select ‘Featured Software Data’.
- In the right section, you will find ‘default’ file, click on it and change the value from 0 to 1.
Disable Network Services
- Open ‘Services’ page as mentioned in the above stanza or else you can go through the ‘Run’ prompt and for the same, press ‘Windows’ key and ‘R’ key together to open the dialog box and then enter ‘services.msc’ and click on ‘OK’ button.

- Now scroll down the bar to reach ‘Network List Services’ and after finding the same, right-click on it and choose ‘Properties’.

- In the ‘Properties’ section, you will get several features, move to the ‘Startup type’ and select ‘Disabled’ from the drop-down menu.

- After completing the above task, click on the ‘OK’ button.
- Now close all the programs and restart your computer.
Run Windows Troubleshooter
Windows Operating System provides the troubleshooter which fixes the issues and enables the users to operate the Windows effectively. The procedure of operation is simple and for your convenience, the steps are listed beneath.
- Click on the ‘Start’ menu and further click on the ‘Gear’ icon to reach the settings of the Windows.
- After getting into the ‘Windows Settings’ page, you will find several options, choose ‘Update and Security’.
- In the left section of the ‘Windows Update,’ you will find ‘Troubleshoot’, click on it.
- Now click on ‘Windows Update’ and at the bottom of the same, you will find ‘Troubleshoot’, click on it.
- Thereafter, Windows will start fixing the update issue and once it is done, restart your computer.
So, these were the effective measures to fix Windows Update Error 0x80070422. This error must be fixed on the time or else the problem will be increased and it may hamper the OS too. Hence, apply these methods properly to overcome from this issue.
Checkout: How to Enable Night Light in Windows 10?
Windows Update is quite essential for the Operating System and this tool periodically refines the applications and meets the latest technology and enables the users to access the full features of the Windows efficiently. So, get rid of Windows Update error and enjoys the ultimate features of the Windows.
Leave a Reply
You must be logged in to post a comment.